The Taj Mahal of water control pits
Dec. 9th, 2025 09:27 amI spent the weekend building a water control pit for my dad's house. No yoga, no ponies, no Sunday dinner. Just water control pit.
Right now, Dad is at his Mexico House in La Peñita de Jaltemba, which is a small town about an hour north of Puerta Vallarta on the Pacific coast of Mexico. I've been there once, even. Dad texts me every day when he's in Mexico as a proof-of-life thing because he's 83. This morning's text was "It is 80 degrees here this morning."
My dad also has a house in the mountains of south-central Pennsylvania, where it was 16 degrees this morning. Sixteen degrees is a lot colder than eighty. Sixteen degrees is definitely cold enough to freeze some pipes.
I know the Taj Mahal is a tomb. But this one is a water control pit.
My dad's house, which was built in the late 1960's (by him), is on a concrete slab. The water comes into the house from a buried waterline outside the house. The buried water line has an elbow at the bottom and goes straight up to "grade" (ground level) and then has an elbow and goes through the brick wall into the house. This means that there is an elbow and some plumbing that is more or less outside in the fresh air and sunshine, completely unprotected by the insulating power of, well, dirt. Now, fresh air and sunshine is good for people but it's hell on pipes especially when the temperatures regularly get below freezing.
Here is a bad drawing of the problem:
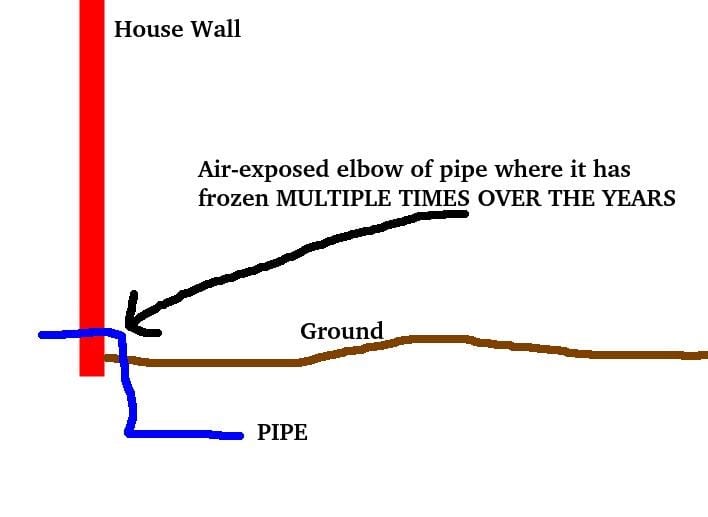
From the late 1960's when the house was built until now, Dad has engaged in a variety of half-vast water pipe shelter "solutions". All of these half-vast solutions have failed to protect the water pipe well enough to keep it from freezing when he is in Mexico. The water at his house doesn't freeze every year, but it freezes often enough that I'm done with this. I am so done. SO DONE.
It is time for a permanent solution.
The last time it froze and broke, I fixed it and made a special note to remind him about building a better hut to protect his water pipe over the winter when the weather was nice so that it would be a good and pleasant time to work on that. And I did, that summer, remind him about building a better hut to protect his water pipe. I even asked him if he needed help designing or building a better hut to protect his water because he is in his eighties and might reasonably want someone else to run the shovel and stuff. He said no, that it would be fine and that he would handle it.
It was not fine and he did not handle it.
He constructed a bullshit effort out of craptacular chipboard (unpainted) that shredded into uselessness within the space of a few years. I did not know that this was what he had done because I did not inspect his construction. He said it would be fine and that he would handle it and I believed him. I didn't realize that we were in trust but verify territory over here, but apparently we are. *sigh*
This year, as I was driving him to the airport, I asked him if he had winterized his water hut so that his pipes wouldn't freeze. He said he had taken care of it.
This was also not true and again, it's trust but verify and never again just trust. Damn it. I know he didn't look at it because if he had, at all, he would have seen that the water hut lid (of chipboard) had caved in and that the elbow fitting and shutoff below it were open to the fresh air and sunshine. He is not enough of an idiot to think that things would be "fine" under those circumstances, so the truth of the matter is that he did not look at it and just lied about having taken care of it. *sigh*
So, when I stopped by to check on his house, which I do sometimes when he is away, I heard PSSSSHH. As I've mentioned on previous occasions, this is not a good plumbing noise. I took a short video of the water spraying visibly and audibly out of the frozen, broken valve. I texted it to him in Mexico.
His response: It was all good when I left.
*headdesk*
Well, the first thing you do when there is a leak is shut the water off. Turns out that there is not a findable/usable shutoff valve between my dad's house and the main water line (it's a co-op). There is supposed to be a usable shutoff valve between my dad's house and the main water line, but there is not one. Hunh.
If you want to work on the water at my dad's house, you have to drive up the road and park and hike to the water hut and shut off the main to interrupt service to four other houses besides my dad's house so that you can work on his plumbing. This is not ideal. (We will be installing a proper shutoff at the main with a 2' water control pit this summer when the weather is nicer. I am SO DONE with this bullshit and half-assing. SO DONE.)
When I get this done with a project, I generally fix it so fixed that I will not ever have to do it again. That's how you get the Taj Mahal of water control pits.
Anyway. We got the water shut off in the hut and commenced to digging up the water line back at my dad's house. (Brother the elder was helping me, this is not the royal We today.)
We dug a big hole in the sodden ground (pipe had been spraying water all over it for days so instead of being frozen, it was sodden) because it takes a big hole to sink a 2' diameter culvert pipe 2.5' into the ground. That's a lot of digging done super close to the house. Because we didn't know how deep the water line actually was, we used shovels and not machinery. (It's hard to put a shovel through pipe but machinery can break pipe in the blink of an eye.)
The dirt we were digging was sodden orange clay, which is not pleasant to dig even in summertime. It's less so in winter.
With the pit dug, we cut the pipe at the bottom of the pit (it was wettish and muddy and 2.5' down so not a great fun place to work) and got the correct fitting (2 trips to the hardware plus having to call a professional for advice on what fitting to get) to attach to the very frail 60 year old black poly pipe because ain't no way you can shove a barbed fitting in there OR warm up the pipe to get it to soften enough to shove a barbed fitting in there. Barbed fitting was a no-go.
We had to use a thing called a crimp fitting. It looks like this and it was what was on the pipe closer up to the house only they don't really come off well once they're on. So we had to get a new one. I'd never used one before and accidentally put the washer in upside down. #noob I didn't notice that the internal washer was shaped and didn't know that "the washer is upside down" was a possible problem that could be had. Oops.
Anyway, with the washer installed upside down, I couldn't tighten the fitting enough to get it to not leak. It wasn't leaking brutally, just a slow-ish ooze into the pit outside the house, so we turned the water back on (restoring service to the other houses) and called my professional plumber guy to come look at it the next day.
Fitting installed(ish), we arranged the culvert pipe so that it fit into the hole and sat as close up against the building as we could get it to do. We had to cut a slit into it to allow for the plumbing to go INTO the building, but the saber saw made short work of that project.
Now, it turns out that if you dig a pit in solid orange clay and leave a leaking pipe at the bottom of it, the next morning you have a pond. Congrats on your new water feature! *sigh* I used a five gallon bucket to bail out the "pond" before my pro got there. He costs a lot more than I do and bailing is unskilled labor. I can bail just fine.
When my professional plumber guy came the next morning, he knelt on the nice dry 3' square piece of 3/4" plywood that I'd put on top of the squishy, slick wet clay, leaned down into the (bailed out) pit, took the problematic fitting apart, flipped the washer, snugged the pipe up, and was done in under thirty minutes. Didn't even get any mud on him. That's why he's the pro and I'm the dipshit.
The rest of the plumbing was just tinker toys (pex and crimp rings) to hook everything up and add a very low-tech blowout system so that the part of the pipe that is above grade is (a) enclosed in the culvert pipe and (b) will only ever contain air when my dad is not at home.
Here's a pic of the bottom of the pit, showing the fancy brass crimp connector, the outside-the-house main shutoff and the "drain" valve:
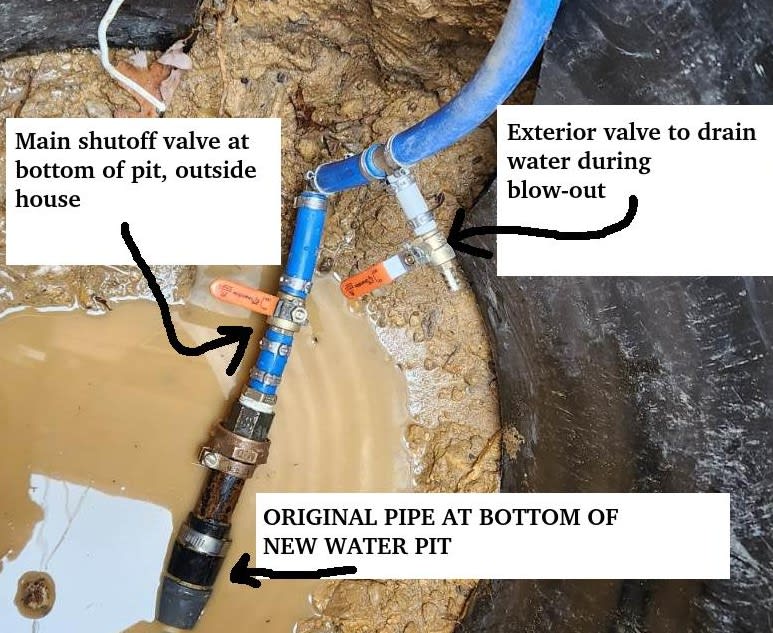
I also replaced the entire run from the outside elbow to the inside shutoff/air intake (it had been patched multiple times) with one smooth piece of pex so that it will drain nicely.
Brother the elder and I filled in dirt around the culvert pipe. It'll probably settle some by spring but there is more dirt there that we can use to top off any settling at a later date. For right now, we filled the inside of the culvert pipe with contractor bags of dry fluffy leaves (to help insulate the pipes at the bottom of the pit). The contractor bags of leaves are cheap, light weight, biodegradable, and pretty decent as insulation material.
The leaf bags will definitely keep things from freezing until my nylon beanbag chair gets here.
What the fuck is the beanbag chair for?
The beanbag chair will fit snugly into the 2' diameter culvert pipe (it is 27.5" but "squishy") and keep cold air from dropping down into the pit and freezing my pipes. It will provide insulation between the NONFROZEN earth at the bottom of the Taj Mahal and the cold air outside the Taj Mahal. Polystyrene beads are not-very-wettable, lightweight, and provide excellent insulation. Having them enclosed in a nice sturdy nylon bag WITH A HANDLE ON IT is a bonus. I'm still going to put a bag of leaves on top of the beanbag chair because I DO NOT want to be in a muddy pit in the winter again. I don't like muddy pits. I do not like them, Sam I Am.
Anyway, then I used a pool noodle, some hardware-cloth (this is 1/4" metal mesh) and expanding spray foam to fix up the part of the culvert pipe we had to cut to fit against the house and make a surface for the pit lid to rest on over there. The lid needs to fit tightly to keep animals out and prevent cold air from falling into the pit and freezing the pipes. I am ALL ABOUT not freezing the fucking pipes.
To make a nicely-conformed surface, I approximated the needed shape with pool noodle and hardware cloth, then thoroughly sprayed it all with expanding foam. Next, I put a piece of trashbag over the wet expanding spray foam to keep the spray foam from contacting the pit lid and then put the lid in place. This was to ensure that the foam would expand and conform to the lid but not STICK to the lid. It worked great, I checked it this morning. Everything set up well and the lid is tight but not stuck in place.
The pit lid is technically a septic tank lid. The hardware store helpfully shared that plastic septic tank lids fit perfectly on top of 2' diameter plastic culvert pipes. Plastic does not rot like chipboard, so yeah. I want that.
Here's a picture of a mostly-done pit (I hadn't done the pool-noodle/expanding foam part yet) with lid off to the side:
This is all lovely, but will it work?
The blowout part works, I tested it. A normal person can totally puff enough air into the pipe to get it to drain thoroughly.
And it seems to be keeping the pipes warm enough -- it was 16 degrees last night. The tiny bit of water in the bottom of the pit was still liquid when I checked it this morning. I will continue to monitor the situation and make sure that what I have is sufficient to keep the pipe functional and unfrozen, but I'm pretty sure I've got it. The beanbag chair arrives next week and I'll install that when it gets here.
Here's a schematic of the blowout system I built for my dad's house. It is as low tech as possible and I will DO IT WITH HIM EVERY FUCKING TIME because I am not going to trust that he will take care of it on his own.
#neveragain
The section of the pipe between "air inlet" (inside the house) and "drain valve" (outside the house near the bottom of the pit) will be filled with AIR when my dad is not at home and thus will never freeze again. SO DONE.
To drain the system and prepare to go to Mexico:
1. Shut off main inside house.
2. Go outside.
3. Take lid off pit.
4. Remove insulation, set aside.
5. Shut off main at bottom of pit.
6. Open 1/2" ball valve for drain.
7. Go back inside house.
8. Open air inlet valve, puff air into it (by mouth).
9. Go outside house, wait for drain to stop.
10. Shut drain valve.
11. Put insulation back in pit.
12. Put lid on pit.
13. Go inside house
14. Shut air inlet valve.
On returning home from Mexico:
1. Inside house, verify that main is off.
2. Verify that air intake is off.
3. Outside house, take lid off pit.
4. Remove insulation from pit.
5. Verify that drain is off.
6. Open main inside pit.
7. Replace insulation in pit.
8. Put lid back on pit.
9. Go inside.
10. Turn on inside main.
Right now, Dad is at his Mexico House in La Peñita de Jaltemba, which is a small town about an hour north of Puerta Vallarta on the Pacific coast of Mexico. I've been there once, even. Dad texts me every day when he's in Mexico as a proof-of-life thing because he's 83. This morning's text was "It is 80 degrees here this morning."
My dad also has a house in the mountains of south-central Pennsylvania, where it was 16 degrees this morning. Sixteen degrees is a lot colder than eighty. Sixteen degrees is definitely cold enough to freeze some pipes.
I know the Taj Mahal is a tomb. But this one is a water control pit.
My dad's house, which was built in the late 1960's (by him), is on a concrete slab. The water comes into the house from a buried waterline outside the house. The buried water line has an elbow at the bottom and goes straight up to "grade" (ground level) and then has an elbow and goes through the brick wall into the house. This means that there is an elbow and some plumbing that is more or less outside in the fresh air and sunshine, completely unprotected by the insulating power of, well, dirt. Now, fresh air and sunshine is good for people but it's hell on pipes especially when the temperatures regularly get below freezing.
Here is a bad drawing of the problem:
From the late 1960's when the house was built until now, Dad has engaged in a variety of half-vast water pipe shelter "solutions". All of these half-vast solutions have failed to protect the water pipe well enough to keep it from freezing when he is in Mexico. The water at his house doesn't freeze every year, but it freezes often enough that I'm done with this. I am so done. SO DONE.
It is time for a permanent solution.
The last time it froze and broke, I fixed it and made a special note to remind him about building a better hut to protect his water pipe over the winter when the weather was nice so that it would be a good and pleasant time to work on that. And I did, that summer, remind him about building a better hut to protect his water pipe. I even asked him if he needed help designing or building a better hut to protect his water because he is in his eighties and might reasonably want someone else to run the shovel and stuff. He said no, that it would be fine and that he would handle it.
It was not fine and he did not handle it.
He constructed a bullshit effort out of craptacular chipboard (unpainted) that shredded into uselessness within the space of a few years. I did not know that this was what he had done because I did not inspect his construction. He said it would be fine and that he would handle it and I believed him. I didn't realize that we were in trust but verify territory over here, but apparently we are. *sigh*
This year, as I was driving him to the airport, I asked him if he had winterized his water hut so that his pipes wouldn't freeze. He said he had taken care of it.
This was also not true and again, it's trust but verify and never again just trust. Damn it. I know he didn't look at it because if he had, at all, he would have seen that the water hut lid (of chipboard) had caved in and that the elbow fitting and shutoff below it were open to the fresh air and sunshine. He is not enough of an idiot to think that things would be "fine" under those circumstances, so the truth of the matter is that he did not look at it and just lied about having taken care of it. *sigh*
So, when I stopped by to check on his house, which I do sometimes when he is away, I heard PSSSSHH. As I've mentioned on previous occasions, this is not a good plumbing noise. I took a short video of the water spraying visibly and audibly out of the frozen, broken valve. I texted it to him in Mexico.
His response: It was all good when I left.
*headdesk*
Well, the first thing you do when there is a leak is shut the water off. Turns out that there is not a findable/usable shutoff valve between my dad's house and the main water line (it's a co-op). There is supposed to be a usable shutoff valve between my dad's house and the main water line, but there is not one. Hunh.
If you want to work on the water at my dad's house, you have to drive up the road and park and hike to the water hut and shut off the main to interrupt service to four other houses besides my dad's house so that you can work on his plumbing. This is not ideal. (We will be installing a proper shutoff at the main with a 2' water control pit this summer when the weather is nicer. I am SO DONE with this bullshit and half-assing. SO DONE.)
When I get this done with a project, I generally fix it so fixed that I will not ever have to do it again. That's how you get the Taj Mahal of water control pits.
Anyway. We got the water shut off in the hut and commenced to digging up the water line back at my dad's house. (Brother the elder was helping me, this is not the royal We today.)
We dug a big hole in the sodden ground (pipe had been spraying water all over it for days so instead of being frozen, it was sodden) because it takes a big hole to sink a 2' diameter culvert pipe 2.5' into the ground. That's a lot of digging done super close to the house. Because we didn't know how deep the water line actually was, we used shovels and not machinery. (It's hard to put a shovel through pipe but machinery can break pipe in the blink of an eye.)
The dirt we were digging was sodden orange clay, which is not pleasant to dig even in summertime. It's less so in winter.
With the pit dug, we cut the pipe at the bottom of the pit (it was wettish and muddy and 2.5' down so not a great fun place to work) and got the correct fitting (2 trips to the hardware plus having to call a professional for advice on what fitting to get) to attach to the very frail 60 year old black poly pipe because ain't no way you can shove a barbed fitting in there OR warm up the pipe to get it to soften enough to shove a barbed fitting in there. Barbed fitting was a no-go.
We had to use a thing called a crimp fitting. It looks like this and it was what was on the pipe closer up to the house only they don't really come off well once they're on. So we had to get a new one. I'd never used one before and accidentally put the washer in upside down. #noob I didn't notice that the internal washer was shaped and didn't know that "the washer is upside down" was a possible problem that could be had. Oops.
Anyway, with the washer installed upside down, I couldn't tighten the fitting enough to get it to not leak. It wasn't leaking brutally, just a slow-ish ooze into the pit outside the house, so we turned the water back on (restoring service to the other houses) and called my professional plumber guy to come look at it the next day.
Fitting installed(ish), we arranged the culvert pipe so that it fit into the hole and sat as close up against the building as we could get it to do. We had to cut a slit into it to allow for the plumbing to go INTO the building, but the saber saw made short work of that project.
Now, it turns out that if you dig a pit in solid orange clay and leave a leaking pipe at the bottom of it, the next morning you have a pond. Congrats on your new water feature! *sigh* I used a five gallon bucket to bail out the "pond" before my pro got there. He costs a lot more than I do and bailing is unskilled labor. I can bail just fine.
When my professional plumber guy came the next morning, he knelt on the nice dry 3' square piece of 3/4" plywood that I'd put on top of the squishy, slick wet clay, leaned down into the (bailed out) pit, took the problematic fitting apart, flipped the washer, snugged the pipe up, and was done in under thirty minutes. Didn't even get any mud on him. That's why he's the pro and I'm the dipshit.
The rest of the plumbing was just tinker toys (pex and crimp rings) to hook everything up and add a very low-tech blowout system so that the part of the pipe that is above grade is (a) enclosed in the culvert pipe and (b) will only ever contain air when my dad is not at home.
Here's a pic of the bottom of the pit, showing the fancy brass crimp connector, the outside-the-house main shutoff and the "drain" valve:
I also replaced the entire run from the outside elbow to the inside shutoff/air intake (it had been patched multiple times) with one smooth piece of pex so that it will drain nicely.
Brother the elder and I filled in dirt around the culvert pipe. It'll probably settle some by spring but there is more dirt there that we can use to top off any settling at a later date. For right now, we filled the inside of the culvert pipe with contractor bags of dry fluffy leaves (to help insulate the pipes at the bottom of the pit). The contractor bags of leaves are cheap, light weight, biodegradable, and pretty decent as insulation material.
The leaf bags will definitely keep things from freezing until my nylon beanbag chair gets here.
What the fuck is the beanbag chair for?
The beanbag chair will fit snugly into the 2' diameter culvert pipe (it is 27.5" but "squishy") and keep cold air from dropping down into the pit and freezing my pipes. It will provide insulation between the NONFROZEN earth at the bottom of the Taj Mahal and the cold air outside the Taj Mahal. Polystyrene beads are not-very-wettable, lightweight, and provide excellent insulation. Having them enclosed in a nice sturdy nylon bag WITH A HANDLE ON IT is a bonus. I'm still going to put a bag of leaves on top of the beanbag chair because I DO NOT want to be in a muddy pit in the winter again. I don't like muddy pits. I do not like them, Sam I Am.
Anyway, then I used a pool noodle, some hardware-cloth (this is 1/4" metal mesh) and expanding spray foam to fix up the part of the culvert pipe we had to cut to fit against the house and make a surface for the pit lid to rest on over there. The lid needs to fit tightly to keep animals out and prevent cold air from falling into the pit and freezing the pipes. I am ALL ABOUT not freezing the fucking pipes.
To make a nicely-conformed surface, I approximated the needed shape with pool noodle and hardware cloth, then thoroughly sprayed it all with expanding foam. Next, I put a piece of trashbag over the wet expanding spray foam to keep the spray foam from contacting the pit lid and then put the lid in place. This was to ensure that the foam would expand and conform to the lid but not STICK to the lid. It worked great, I checked it this morning. Everything set up well and the lid is tight but not stuck in place.
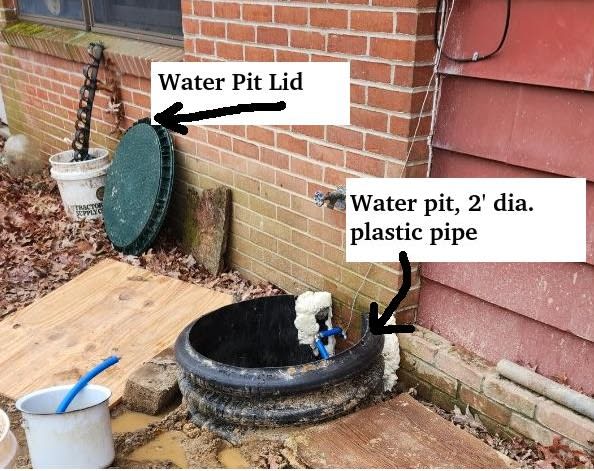
The pit lid is technically a septic tank lid. The hardware store helpfully shared that plastic septic tank lids fit perfectly on top of 2' diameter plastic culvert pipes. Plastic does not rot like chipboard, so yeah. I want that.
Here's a picture of a mostly-done pit (I hadn't done the pool-noodle/expanding foam part yet) with lid off to the side:
This is all lovely, but will it work?
The blowout part works, I tested it. A normal person can totally puff enough air into the pipe to get it to drain thoroughly.
And it seems to be keeping the pipes warm enough -- it was 16 degrees last night. The tiny bit of water in the bottom of the pit was still liquid when I checked it this morning. I will continue to monitor the situation and make sure that what I have is sufficient to keep the pipe functional and unfrozen, but I'm pretty sure I've got it. The beanbag chair arrives next week and I'll install that when it gets here.
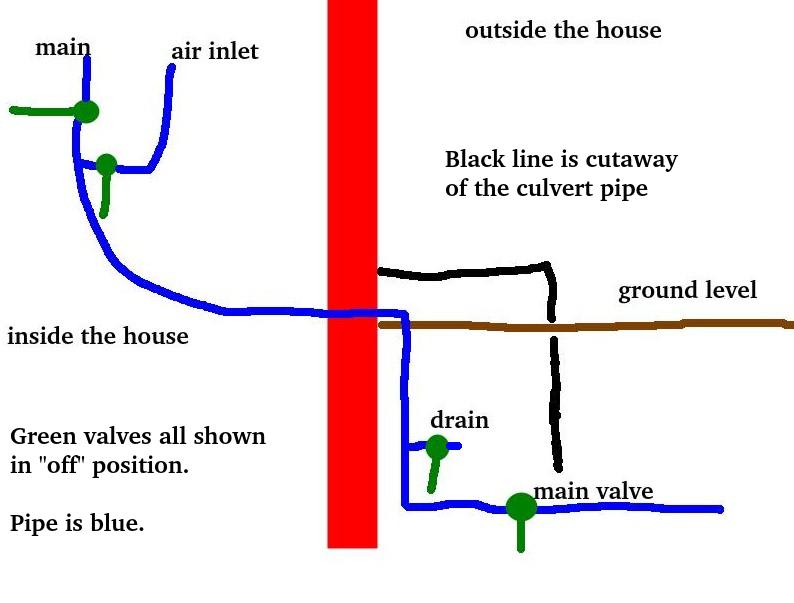
Here's a schematic of the blowout system I built for my dad's house. It is as low tech as possible and I will DO IT WITH HIM EVERY FUCKING TIME because I am not going to trust that he will take care of it on his own.
#neveragain
The section of the pipe between "air inlet" (inside the house) and "drain valve" (outside the house near the bottom of the pit) will be filled with AIR when my dad is not at home and thus will never freeze again. SO DONE.
To drain the system and prepare to go to Mexico:
1. Shut off main inside house.
2. Go outside.
3. Take lid off pit.
4. Remove insulation, set aside.
5. Shut off main at bottom of pit.
6. Open 1/2" ball valve for drain.
7. Go back inside house.
8. Open air inlet valve, puff air into it (by mouth).
9. Go outside house, wait for drain to stop.
10. Shut drain valve.
11. Put insulation back in pit.
12. Put lid on pit.
13. Go inside house
14. Shut air inlet valve.
On returning home from Mexico:
1. Inside house, verify that main is off.
2. Verify that air intake is off.
3. Outside house, take lid off pit.
4. Remove insulation from pit.
5. Verify that drain is off.
6. Open main inside pit.
7. Replace insulation in pit.
8. Put lid back on pit.
9. Go inside.
10. Turn on inside main.
no subject
Date: 2025-12-09 08:21 pm (UTC)My grandmother who lived in Saskatchewan where the avg temps in Dec-Feb range from 12F to 18F - used to occasionally come visit us in British Columbia (where we rarely got below freezing) for a month or 6 weeks around Christmas/January.
And her solution to prevent her pipes from freezing - she would just leave the kitchen tap running at a trickle, the entire time she was gone.
Young kid me, felt like that was a PRETTY BAD SOLUTION - so 40 years later, I am pleased as punch to find someone come up with a PROPER FIX
Honestly, if she had a fix like that, she would have come to visit more often and stayed longer :D She was always worrying about her pipes freezing!
no subject
Date: 2025-12-09 10:52 pm (UTC)I'm surprised to hear that BC doesn't get colder -- but probably the ocean is helpful in that regard. :)
Here, we get decently cold (but not brutally cold) winters. (I have a cousin who lives in Minneapolis/St. Paul and... that's brutally cold.) In south-central Pennsylvania, a cold, but not remarkable winter night is 12F to 15F (approx. -11C to -9C). An unusually cold winter night would be single digits (9F or less, so colder than -12.7C) and some folks would for sure have frozen pipes as a result of the chill. More typical winter nights are below freezing, in the mid 20'sF (-5C) with daytime temps hovering right around the freezing mark.
no subject
Date: 2025-12-10 04:34 am (UTC)My grandmother lived in a city - but she still had that same issue that your dad's house has - the weird little elbow of exposed pipe. Her house was probably from the late 40s, early 50s though - so presumably newer construction has solved such things :D
no subject
Date: 2025-12-10 01:57 am (UTC)Having your drain -in- the pit seems like an, um, damp solution, but offhand I can't think of a better one and you aren't draining a huge amount of water into the pit.
The leaf insulation is a lovely idea, and I like the expanding foam in a bag.
no subject
Date: 2025-12-12 03:55 am (UTC)